Product Similar To:
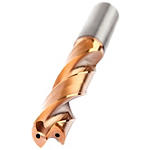
KenDrill™ HPR • 5 x D • Internal Coolant • Straight Shank • Inch
Solid Carbide Drill for Cast Iron and Steels
Material Number6783532
ISO Catalog IDK255A06563HPRANSI Catalog IDK255A06563HPR
- P Steel
- K Cast Iron
Drilling
Drilling: Inclined Exit
Drilling: Stacked Plates
Drilling: Cross-Hole Drilling
Sending to {{cadTool}} in progress...
Downloaded file will be available after import in the {{cadTool}} tool library.
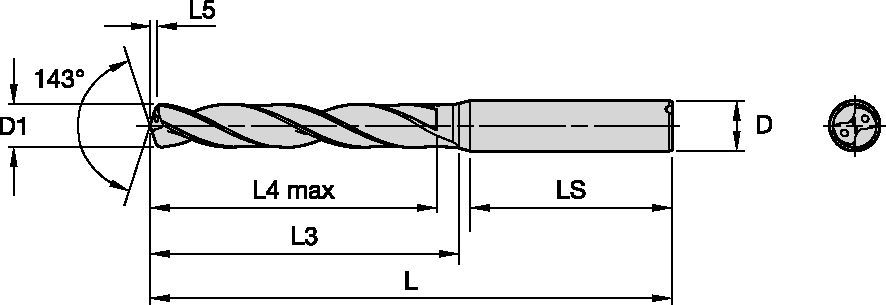
| Material Number | 6783532 |
| ISO Catalog ID | K255A06563HPR |
| ANSI Catalog ID | K255A06563HPR |
| Grade | KCK10A |
| [D1] Drill Diameter M | 16.67 mm |
| [D1] Drill Diameter M | 0.6563 in |
| [L] Overall Length | 143 mm |
| [L] Overall Length | 5.6299 in |
| [L3] Flute Length | 92 mm |
| [L3] Flute Length | 3.622 in |
| [L4] Maximum Drilling Depth | 73 mm |
| [L4] Maximum Drilling Depth | 2.874 in |
| [L5] Drill Point Length | 4.17 mm |
| [L5] Drill Point Length | 0.1642 in |
| [LS] Shank Length | 48.5 mm |
| [LS] Shank Length | 1.9094 in |
| [D] Adapter / Shank / Bore Diameter | 17.4625 mm |
| [D] Adapter / Shank / Bore Diameter | 0.6875 in |
Workpiece Materials
- Steel
- Cast Iron
Uses and application
Drilling
Drilling: Inclined Exit
Drilling: Stacked Plates
Drilling: Cross-Hole Drilling
Grades

KCK10A
Composition: Multilayered PVD AlTiN-based coated submicron grain carbide with superior surface finish.
Application: First choice for cast iron. This grade utilizes a newly developed coating combined with a state-of-the-art surface condition to offer extraordinary wear resistance in abrasive materials at elevated cutting conditions with improved performance consistency.
Features and benefits
- HPR point thinning provides excellent self-centering capabilities along with low-thrust, enabling maximum hole straightness.
- 4 margin lands are deal for cross holes and inclined exits, proving maximum stability.
- Drills holes 5X its diameter, making it ideal for deep-hole applications.
- AlTiN/AlTiSiN multi-layer coating withstands abrasive and thermal loads to increase tool life.
- Patented corner radius enables long tool life and excellent hole quality by avoiding workpiece chipping during evacuation.
- HA shank design reduces vibration and provides increased stability, reducing the risk of breakage. All shanks are Minimum Quantity Lubrication (MQL) ready and fulfill the DIN 6535 and 69090-03 requirements.
Create Solution to calculate Feeds and Speeds
After creating a solution just choose the Feeds & Speeds icon and our system will provide recommendations. You can customize the information by adding your machine and specifications or make adjustments using the sliders.
Application Data
| Material |  |  | |||||||||||
| Cutting Speed | Metric | ||||||||||||
| Range | Recommended Feed Rate per Rev | ||||||||||||
| Min | Starting Value | Max | 3,0 | 4,0 | 6,0 | 8,0 | 10,0 | 12,0 | 16,0 | 20,0 | |||
| K | 1 | 130 | 160 | 210 | mm/r | 0,12 | 0,14 | 0,16 | 0,22 | 0,30 | 0,34 | 0,38 | 0,42 |
| 2 | 90 | 130 | 180 | mm/r | 0,12 | 0,14 | 0,16 | 0,22 | 0,30 | 0,34 | 0,38 | 0,42 | |
| 3 | 70 | 90 | 130 | mm/r | 0,11 | 0,12 | 0,22 | 0,24 | 0,26 | 0,28 | 0,30 | 0,34 | |
| Material |  |  | |||||||||||
| Cutting Speed | Inch | ||||||||||||
| Range | Recommended Feed Rate per Rev | ||||||||||||
| Min | Starting Value | Max | 1/8 .125 | 3/16 .188 | 1/4 .250 | 5/16 .313 | 3/8 .375 | 1/2 .500 | 5/8 .625 | 3/4 .750 | |||
| K | 1 | 430 | 520 | 690 | IPR | .005 | .006 | .006 | .009 | .012 | .013 | .015 | .017 |
| 2 | 300 | 430 | 590 | IPR | .005 | .006 | .006 | .009 | .012 | .013 | .015 | .017 | |
| 3 | 230 | 300 | 430 | IPR | .004 | .005 | .009 | .009 | .010 | .011 | .012 | .013 | |
| Application Data B/K25_HPR Series Grade KCK10A • Through Coolant • Metric | |||||||||||
| Cutting Speed | Feed rate (f) = mm/r by diameter | ||||||||||
| Material | Min | Starting Value | Max | 3,0 | 4,0 | 6,0 | 8,0 | 10,0 | 12,0 | 16,0 | 20,0 |
| P | |||||||||||
| P0 | 140 | 240 | 290 | 0.13 | 0.14 | 0.16 | 0.18 | 0.19 | 0.21 | 0.25 | 0.28 |
| P1 | 130 | 240 | 290 | 0.15 | 0.16 | 0.18 | 0.2 | 0.22 | 0.24 | 0.28 | 0.32 |
| P2 | 190 | 230 | 270 | 0.14 | 0.15 | 0.18 | 0.21 | 0.24 | 0.27 | 0.33 | 0.39 |
| P3 | 130 | 160 | 190 | 0.15 | 0.17 | 0.2 | 0.23 | 0.27 | 0.3 | 0.36 | 0.43 |
| P4 | 110 | 150 | 170 | 0.14 | 0.16 | 0.19 | 0.23 | 0.26 | 0.3 | 0.37 | 0.44 |
| P5 | 70 | 90 | 110 | 0.12 | 0.13 | 0.16 | 0.19 | 0.21 | 0.24 | 0.3 | 0.35 |
| P6 | 60 | 80 | 100 | 0.12 | 0.13 | 0.16 | 0.19 | 0.21 | 0.24 | 0.3 | 0.35 |
| K | |||||||||||
| K1 | 130 | 160 | 210 | 0.12 | 0.15 | 0.21 | 0.26 | 0.3 | 0.34 | 0.41 | 0.47 |
| K2 | 90 | 130 | 180 | 0.12 | 0.15 | 0.21 | 0.26 | 0.3 | 0.34 | 0.41 | 0.47 |
| K3 | 70 | 100 | 130 | 0.1 | 0.13 | 0.18 | 0.23 | 0.27 | 0.31 | 0.37 | 0.43 |
Tolerance
| nominal size range | D1 tolerance m7 | D tolerance h6 |
| 1–3 | 0,002/0,012 | 0,000/-0,006 |
| 3–6 | 0,004/0,016 | 0,000/-0,008 |
| 6–10 | 0,006/0,021 | 0,000/-0,009 |
| 10–18 | 0,007/0,025 | 0,000/-0,011 |
| 18–25,4 | 0,008/0,029 | 0,000/-0,013 |
| nominal size range | D1 tolerance m7 | D tolerance h6 |
| .0394–.1181 | .0001/.0005 | .0000/-.0002 |
| .0002/.0006 | .0000/-.0003 | |
| .0002/.0008 | .0000/-.0004 | |
| .0003/.0010 | .0000/-.0004 | |
| .0003/.0011 | .0000/-.0005 |
I have read and accepted the Terms & Conditions of use

